A webinar I did a while back focusing on the practical applications of dynamo, and where you might using it after learning the basics.
Thursday 15 December 2016
Tuesday 6 May 2014
Monday 10 March 2014
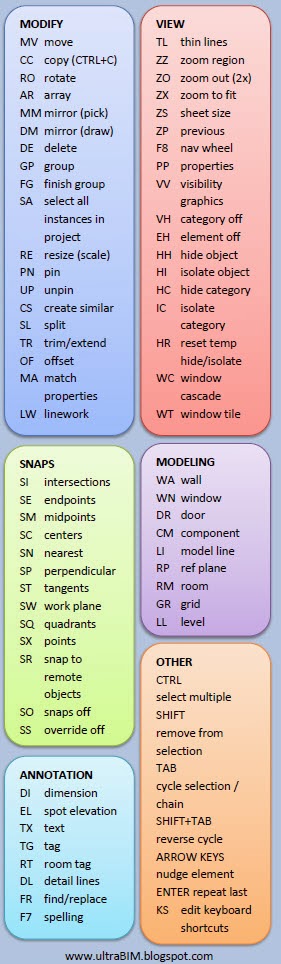
Revit Keyboard Shorcuts list
I have created a list of Revit Keyboard shortcuts that are commonly used, it is designed to be printed and fixed to the side of the screen while you are learning Revit. Although there are some good ones on there for experienced users also.
 |
| In action |
Thursday 9 January 2014
Revit Top Tips
A webinar I did for work, a mix of quick tips and best practice
http://www.a2ktechnologies.com.au/video/revit-top-tips_26
00.00 Intro
03.20 Save intervals
04.48 AUGI create local tool
10.26 Copying through links
11.46 Shared coordinates setup
21.48 Guide grids
23.20 Graphical glazing schedules for curtain walls
25.19 One DWG export rather than one per plan
30.00 Save To Central, tags losing host issue
36.14 Orient 3D to view, section box modify in plan first
38.09 Turn off MEP colour styles before sharing model
Monday 6 January 2014
Nested If statement generator
A spreadsheet I put together to speed up the annoying process of creating nested if statements in Revit formulas. I only did 27 levels of nesting, this could be expanded easily.
Download Current Live version - File > "download as" can be used below
(Note: Operators such as = will need to be cleaned up in excel as the show up as '=)
Download Example version
Download Current Live version - File > "download as" can be used below
(Note: Operators such as = will need to be cleaned up in excel as the show up as '=)
Download Example version
Example Version:
This example uses the "less than" operator to adjust a value based on the "Width" parameter, if it is below 500 the value is 50, if between 500 and 700 it is 75 and so on...
Tuesday 26 November 2013
AUGI create local tool
Great little tool, it creates a one click shortcut to open correct version of Revit and either:
Create new local
Create new local and specify worksets
Detach and open a copy of the model
(It also replaces the word central in the local file with the username)
Here are the instructions: http://do-u-revit.blogspot.com.au/p/revit-make-local_10.html
As promised in my webinar, here is the link to the updated build I have made:
Link
(Still not perfect, seems to be having some journal issues)
Monday 25 November 2013
Shared Coordinates Setup
This is a critical step at the start of every project, I have seen it done wrong many times, and fixing it up after the fact is much more difficult than getting it right in the first place.
There are a number of methods, below is a straight forward method to set this up based on a DWG survey. The example is having received a 2D DWG.


Both surveys should line up.
These DWG's can be detached, and this exported file used for coordination with any consultants using AutoCAD.
A note should be sent with the exported DWG file stating:
The survey file received for the ________ project has a large distance from the origin point. This can cause accuracy issues, as noted in this article: http://www.cadalyst.com/aec/tip-autocad039s-big-problem-3383
We have therefore established a project base point closer to the site, this can be found as the WCS 0,0,0 point in the attached _________.dwg file. There is also a "Survey Point" UCS point in the file for reference.
It is best practice for all consultants working in Millimeters to use this project base point as WCS 0,0,0 in all files, to Xref the survey file, switch to the Survey Point UCS then Xref at 0,0,0.
And obviously this file can be sent out to any consultants in Revit for them to "Acquire Coordinates" from.
There are a number of methods, below is a straight forward method to set this up based on a DWG survey. The example is having received a 2D DWG.
Definitions
Survey Point:
The point the surveyor has used as WCS 0,0,0 in their survey DWG. This is usually a large distance from the actual site, in Australia it is usually based on the Australian Map Grid. This large distance causes many issues when working in CAD software (read here) therefore a project base point needs to be established closer to the site.Project Base Point:
A virtual point close to the site that consultants working in mm will use as WCS 0,0,0 for coordination. This does not need to relate to a physical element on the site, therefore a corner of the title boundary can be used. (usually bottom left)Project North:
A direction identified so that the proposed building/design is aligned with the drawing sheet (to save having to rotate every view).Instructions
1. Check CAD Survey
Open survey file in AutoCAD, choose appropriate project base point and project north. |
| Survey zoomed out Survey zoomed in (project base point and project north chosen) |
Also check units - dimension a road, if it is 10 or so, the file is likely in meters. Ensure units are set correctly.
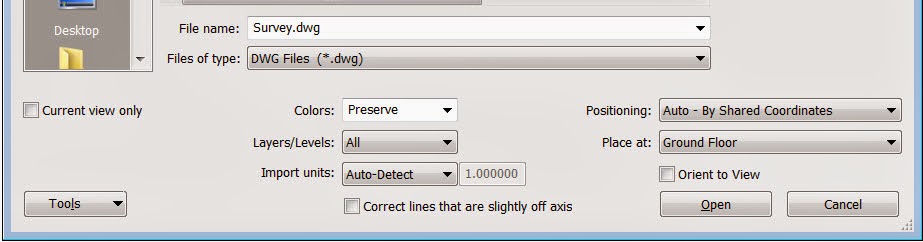
2. Link CAD survey into Revit

Origin to Origin Positioning can be used as the survey will be moved in the next step, Do not use "Current view only".
3. Move CAD Survey
Activate a site plan view and ensure the Project Base point(Circle) and Survey point(Triangle) are visible, they will appear on top of each other if no setup has been completed.
Unpin (If necessary) and move the CAD file so the Project Base point in the CAD file (selected in step 1) is over the Project base point in Revit.
4. Rotate CAD Survey (Optional)
Rotate the CAD file (using the project Base Point as the center of rotation) to align with your chosen project North (From Step 1).
Note: If the file you are linking into is a site only model (recommended) this step is not necessary but can still be undertaken, If the file you are linking into will also contain the building elements and grids this step must be undertaken.
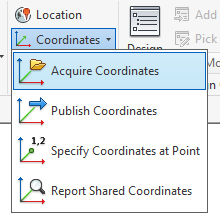
5. Acquire Coordinates from CAD file
Go to Manage > Coordinates > Acquire Coordinates then select the CAD file.
6. Export a DWG of current view

Export using "Project Internal"
Export views as links to enable the survey to easily be detached.
7. Test coordination
In Autocad, Xref original Survey into newly exported file at the "Revit60..." UCS 0,0,0 to test coordination

Both surveys should line up.
These DWG's can be detached, and this exported file used for coordination with any consultants using AutoCAD.
A note should be sent with the exported DWG file stating:
The survey file received for the ________ project has a large distance from the origin point. This can cause accuracy issues, as noted in this article: http://www.cadalyst.com/aec/tip-autocad039s-big-problem-3383
We have therefore established a project base point closer to the site, this can be found as the WCS 0,0,0 point in the attached _________.dwg file. There is also a "Survey Point" UCS point in the file for reference.
It is best practice for all consultants working in Millimeters to use this project base point as WCS 0,0,0 in all files, to Xref the survey file, switch to the Survey Point UCS then Xref at 0,0,0.
And obviously this file can be sent out to any consultants in Revit for them to "Acquire Coordinates" from.
Subscribe to:
Posts (Atom)